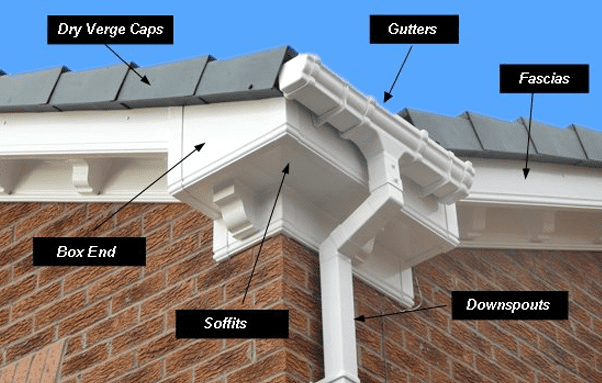
Gutter Replacement & Repairs Peterborough
Throughout this article we will looking at the different types of guttering repairs that our Peterborough based company will attend to. These repairs can be from a simple leaking gutter leading to full gutter replacement. We will then explain how to correctly install a replacement gutter and downpipe.
Overflowing Gutter
One of the first things that a homeowner will notice in regards to gutter problems will be over pouring gutters (often during the night when trying to get some sleep), or down pours from various locations of their gutters. When are roofline team is dispatched the first thing they will check is the gutter outlets. Are these gutter outlets blocked or damaged. Our roofline team will inspect the junction where the gutter outlet meets the downpipe. This can be blocked by debris such as plants, leaves, tennis balls, mud ext. which will prevent the rain water from draining away down the downpipe.
Often there is a high level of dirt which is held within the guttering. This along with anything else must be removed to let the water flow correctly. If the gutter is clear and the water will still not exit via the downpipe, then this pipe will probably be blocked.
Gutters Are Not Level.
If the gutter is still holding water and the gutter and down pipe are clear from debris, then it is highly possible that the gutter is not aligned correctly. As each bracket is attached, a small fall should be calculated to allow running water to reach the lowest part of the gutter run (outlet). This small gutter should be installed to allow a constant ‘fall’ allowing the water to flow at ease cleaning the gutter during travel. If the flow is not constant, then water can build causing joints to break and water to over flow. This build-up during winter months will allow the pooled water to freeze, which will providing unnecessary weight forcing the gutters to expand damaging both the gutters and gaskets.
If this is the case then the gutter will need to be replaced including the brackets and gutter joints. The replacement gutters will need to be installed with a slight fall allow the gutters to work correctly.
Plastic Gutter Joint Replacement
Replacement gutter joint (gutter union) are extremely popular as they commonly leak. The common life span for gutter joints can range between 5 to 20 years depending on their general wear and tear also the quality of materials. Once any of these gutter joints begin to drip, then it’s time to replace them all.
Prior to replacing your gutter joints we will inspect each leaking joint ensuring that they were correctly installed. Often these joints can be unclipped during installation. The gutter should also be inspected ensuring that it has not been moved and no longer effective.
Installing New Guttering and Downpipes
Throughout this part of this blog we show you step by step on how we install new guttering and downpipes. We will be using Half-rounded guttering as we find this extremely durable, lightweight and suitable for most of our work. However, if you find that your particular house obtains an excessive amount of rainfall, or have a very large roof, then we main opt for a high capacity guttering instead.
Prior to the installation the old guttering must be removed and disposed of. If the old guttering is plastic PVCu, then this is quite straight forward. However, if your existing guttering is cast iron then this will be much more difficult to remove.
The guttering we use is available in a wide range of lengths, colours and profiles, so we will be able to provide the right product suitable for your Peterborough property.
The installation for the guttering should be planned correctly so execution can run smoothly saving time and issues on the way.
To ensure that the water will run freely we aim for a fall of 1:350 (around 3mm per meter) towards the outlet. The guttering will be either 2m or 4m in length as it is much easier to cut to size. On roofs that obtain heavy snowfalls, brackets should be fixed onto the fascia’s no more than 400mm apart, offering maximum support.
Step 1
To position the outlet (stop-end) correctly, we must hang a plumb bob from the fascia board ensuring that it will hang directly over the downpipe.
Step 2
Using a pencil firstly mark the position where the outlet will be fixed onto the fascia. The maximum height should be no greater than 50mm below the roof, this is to ensure that the rainfall will not miss the guttering.
Step 3
Pilot holes should be drilled into the fascia-board, this prevents damage to the fascia when the screws are inserted. These screws should never be over screwed as it will damage both the fascia and the outlet.
Step 4
From the opposite side of the fascia from the outlet a measurement of 100mm should be marked. A fascia bracket should then be fixed ensuring that it is higher than the outlet itself. This will ensure that the fall will be correct. We aim for a 3mm difference per meter, i.e. if the gutter is 5m long then it should be 13mm higher on the none outlet side. If however, the outlet sits within the middle of the fascia then this should be repeated on the opposite end also, ensure a correct fall on both sides.
Step 5
At this point a piece of string should be tied from the outlet to the end fascia bracket. This string should pulled tight and tied off.
Step 6
Using a spirit level the string line should be check ensuring that there is a slight downhill fall from the fascia bracket to the outlet.
Step 7
Measure from the end fascia bracket to the outlet bracket, mark at equal distances to where the remaining fascia brackets will be fixed. These brackets should not be any further than 1m apart, this ensures maximum support for the guttering. In regards to any angle or stop-ends, they should be no greater than 150mm.
Step 8
Fix all fascia brackets as you did with the previous one, ensuring that the screws are not over tightened.
Step 9
We recommend lubricating the gutter seals with a silicon spray prior to fitting the guttering. This allows the fittings to be easily connected, increasing the overall expansion and contractibility of this unit. Each gutter seal should be completed in this same manner.
Step 10
Each piece of guttering should be tilted allowing the gutter to sit back beneath the back clip. We recommend that you begin at outlet working towards the highest point. Once the guttering is in place, ‘snap’ it downwards into the correct position. Repeat this to all guttering.
Step 11
At the end of each piece of guttering a union bracket must be fitted. This is used to attach two pieces of guttering together. The union must be then secured to the fascia board.
Step 12
Install the next section of guttering ensuring that the joint lines up correctly with the union bracket. The guttering must also be inserted to the correct depth which will be marked on the fittings.
Step 13
The final piece of gutting should be measured then cut accurately with a hacksaw to the correct length.
Step 14
Finally fit the stop-end to the end of the gutter run.
How to fit the downpipe
Step 1
Hang the plumb line from the centre of the drain outlet pipe. Mark several markings onto the wall showing where the centre of the downpipe should run.
Step 2
If offsets are required then either use an adjustable offset bend or you can even use two offset bends to attach from the outlet junction to the bends. A 6mm gap must however be left at the top of the downpipe which is required expansion purposes.
Step 3
Using the previous markings on the wall, begin at the top of the wall where the outlet begins and position the downpipe clips. Use a pencil and mark where the fix holes should be located. If an offset bend is required, then this should be positioned prior to marking downpipe clip locations.
Step 4
Repeat each downpipe clip position down the wall ensuring that there is no more than 1.8m between each downpipe clip.
Step 5
Drill into the previously marked clip fixing positions. A correct drill bit should be used then a wall plug should be inserted.
Step 6
Beginning from the outlet pipe fix the piece of downpipe by screwing the clips over the downpipe. Ensuring that the downpipe is connected into the outlet first.
Step 7
Finally, fit a downpipe shoe to direct the flow of rainwater into the drain, if required. If this shoe is fitted, then a clip must be applied directly below the socket part of the shoe. This bracket will offer stability to the pipe.

Leave A Comment